Showing posts with label blackboard. Show all posts

Thursday, April 28, 2011

Hiding Courses in Blackboard

Quite a few faculty members have asked about hiding courses in Blackboard.


Depending on the number of courses you teach, you may have 10 or more courses (spanning various semesters) on your Blackboard homepage.

After logging in to Blackboard

media_1285094756179.png
Click on the 'sprocket' on the top right of the module.

Personalizing Your Course List

hid2.png

Select (really Un-Select) Courses you don't Want

hid3.png
Un-select the course(s) you don't want on the front screen.

VoilĂ  -- It's Gone!

hid4.png
If you need further help, please call the 24 hour Blackboard helpline at 202-274-5665 or toll free: 877-736-2585. 

Tuesday, April 26, 2011

Exporting Your Blackboard Course

This brief demo will discuss how to backup your Blackboard course. For a text-based tutorial, view this site from UNC Chapel Hill. Each faculty member is given a set allocation in Blackboard. While UDC does backup all courses, you can keep a copy of your Blackboard site as a file. This file contains the full content of your Blackboard site and can be used to copy the course for a new semester or clear space in your account.

Access the Archive Course Link

2011-01-05_1417_001.png
NOTE: Use the IMPORT PACKAGE option to upload (import) your archived course into a new course shell.

Select Export

2011-01-05_1417_002.png

Choose to Copy the Course

2011-01-05_1421.png
I recommend copying all content. You can always choose NOT to import items, so it's better to save everything. Once you hit SUBMIT, the system will take a few minutes (you will receive an email when done) to package the file

Save the File

2011-01-05_1733.png
Save the file to your computer. You may want to email Ed Jones if you are experiencing space difficulties. He can remove your old site and clear up space in your account.
If you need further help, please call the 24 hour Blackboard helpline at 202-274-5665 or toll free: 877-736-2585.

Thursday, March 24, 2011

Tool Availability in Blackboard

So you just left the department meeting and everyone is RAVING about the new features in Blackboard 9.1 (check here for tutorials).  You immediately rush to http://udc.blackboard.com to login, but you don’t see the tools they were talking about:(
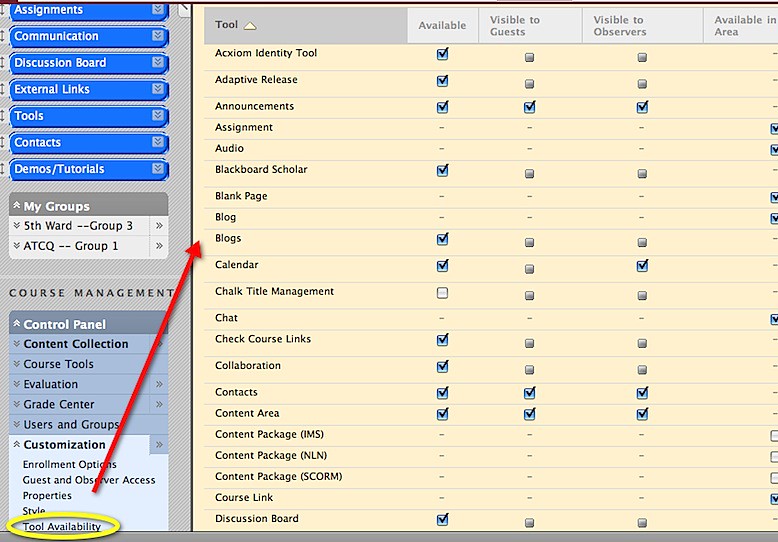
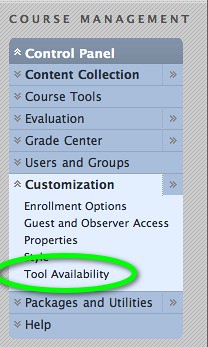
To remedy this, go to the *CUSTOMIZATION* menu under the CONTROL PANEL and select TOOL AVAILABILITY. 
You will see the following page and will have the opportunity to select or deselect items.


t3.jpgTo access the tools, click on *TOOLS* in your menu. 
t2.jpgIf you don't see a tool...go back back to TOOL AVAILABILITY. Be sure to SAVE your options before clicking on another menu item.
t4.jpg
For more information on Blackboard tools, see the annotated User Manual.

Thursday, March 3, 2011

Information Literacy and Web 2.0 Tools for the Classroom

In December, the Center for Academic Technology, part of the Learning Resources Division, gave a presentation to the business school professors.  Here's a Prezi (non-linear Powerpoint) of the presentation.  I allow for zooming and panning on this version.  If you get confused, try this link.


Here's a copy of the tech handout:


Here's the Information Literacy handout:

Thursday, February 17, 2011

Using Respondus Lockdown Browser


What is Respondus LockDown Broswer?
This application is a custom browser that locks down the testing environment within Blackboard and WebCT. When students use Respondus LockDown Browser they are unable to print, copy, go to another URL, or access other applications. When an assessment is started, students are locked into it until they submit it for grading. To learn more about this product, visit http://www.respondus.com/
How do I Setup Respondus LockDown Broswer?
To access Respondus LockDown Browser look under Control Panel.  Then choose Course Tools and finally Respondus LockDown Browser.
Respondus Lockdown Browser then displays all of the tests currently contained in that course.  You then have the option of making that test only available via Respondus Lockdown Browser.   
Be sure to make the download link for the browser available to students.  If they use a non-UDC computer, they must install the software to access the test.  
Modify Settings for Desired Tests


REPEAT AS NEEDED FOR OTHER TESTS.
This video demonstrates Respondus Lockdown Browser to Students:

Other Useful Links:

-          Quick Start Guides for using Respondus LockDown Browser
-          Respondus LockDown Browser Demo Movies for Training
-          Frequently Asked Questions about LockDown Browser
-          The Administrator Area of Respondus.com – product download information for admin and support contacts (requires login)
-          Information sheet: 10 Reasons to Use Respondus LockDown Browser

Finally, if you have any technical questions about LockDown Browser, please don’t hesitate to open a support ticket at http://www.respondus.com/esupport .

Tuesday, February 15, 2011

Intro to Wimba Workshop --- February 15, 2011

Wimba Classroom combines interactive technologies with instructional best practices, allowing educators and students to build relationships.  Wimba classroom, available within Blackboard, is a live, virtual classroom environment with robust features that includes audio, video, application sharing (see video) and content display. 
This workshop will introduce participants to the latest technology which enables instructors to conduct class via with audio, visuals and desktop sharing using Wimba Classroom integrated in Blackboard.  Time permitting, we may discuss Wimba Pronto (instant messenger) and Wimba Voice.

At the end of this workshop, participants will be able to:
1. Navigate the virtual classroom and identify 3 features to employ in the classroom
2. Create a live classroom and load content to be used in the presentation

Powerpoint Slides are available here (and below) .


For more in depth instruction on Advanced features in Wimba, view this presentation from North Dakota State University.To view a YouTube video “Introduction to Wimba Classroom Live”

Monday, February 7, 2011

Creating and Managing Groups in Blackboard

Blackboard 9.1 has multiple ways to engage students in group activities.  Moreover, the grading and assignment capabilities have been streamlined so there are less ‘clicks’ involved to complete a group assignment.

Before you can create group assignments, you must first setup groupsusergroup.jpg.
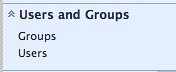
Go to the Control Panel and open the panel *USERS AND GROUPS* then select *GROUPS*


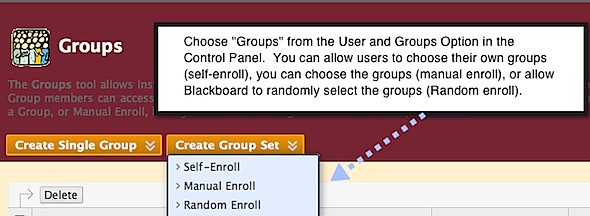
You can form a single group or form groups for all of the students:
gr2.jpg

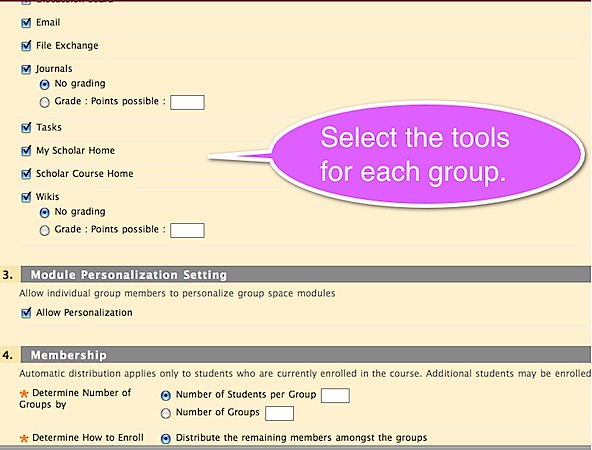
When creating groups, you also have the ability to select which tools and interactions will be available for the group.  You can always modify these options should you choose to add a tool later.

gr3.jpg

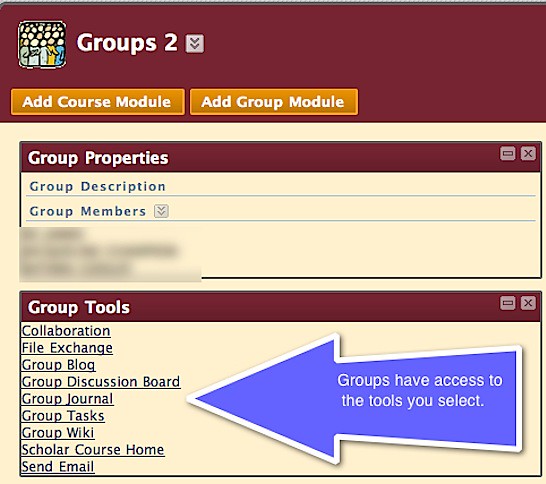
This is how the groups will look. You can add group assignments or grade participation within the existing group tools.
Once the groups are formed, you will have the opportunity to create projects for individuals or for groups.  See the links at the bottom of this post for more information on group work.
gr4.jpg

For more information on Groups and Blackboard, view this annotated version (also below)of the Blackboard 9 User Manual.

If you need further help, please call the 24 hour Blackboard helpline at 202-274-5665 or toll free: 877-736-2585.

Thursday, January 27, 2011

Journals and Blackboard 9

This tutorial will guide students through the steps to post an entry in your student journal in Blackboard. Be sure to follow the instruction from your professor. This is merely a guide on how to use the Blackboard system.

For more information on journals, view the Blackboard User Guide.

Starting Your Submission

start.png
[your Journal may be located in the ASSIGNMENTS secion of your course. This tutotial assumes you have located the correct link]
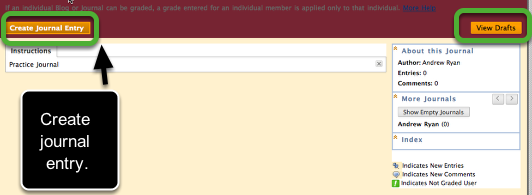
Remember you will have to submit multiple entries. Each time you access the Journal, you will create a new entry. You may have to make multiple entries a week.
You can SAVE entries as DRAFT which can be completed at a later time. You can access your drafts in the top right part of your screen.

Creating Your First Entry

create_journal.png
Use this screen to write your entry. See the Blackboard user manual for more information on using the text editor.

Post Entry

submit.png
You can upload a file before submitting
To POST entry, click POST ENTRY.

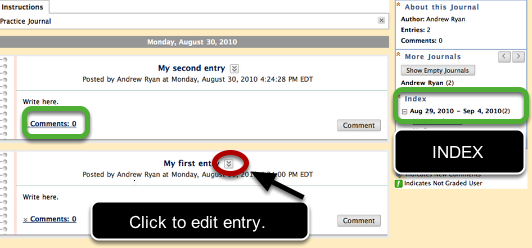
View Your Entries

entries.png
All of your submitted entries will be shown. You can edit the entries IF your instructor has made that option available.
You can view COMMENTS.
Also, the far-right has an INDEX which will show all of your entries (either weekly or monthly). The (2) means there are 2 entries for that time period.
If you have other questions, please contact the Blackboard Helpdesk at (877) 736-2585 or visit their homepage.

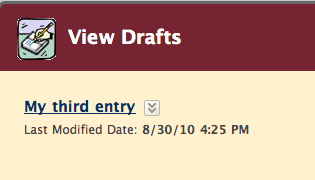
View Drafts

drafts.png
Your drafts will be listed. Your instructor DOES NOT see drafts, only the entries that were submitted.

If you need further help, please call the 24 hour Blackboard helpline at 202-274-5665 or toll free: 877-736-2585. 

Tuesday, January 25, 2011

Supplementing Your Course with Blackboard

You may have seen the announcement of our series via the Firebird on the Fly.  Here's a quick blurb from day 1:

DAY 1: Getting Started -- So you read our New Year's Day post and are ready to use Blackboard in a more expansive manner this semester. Now, you are about to populate your Blackboard course.  

First, read this post on 100 Reasons to Use Blackboard before you start. There's likely a few Blackboard features which have slipped by under the radar. Identify those which may be of help and then go down the checklist below. We've listed a few concepts and skills which will be of help as you build your Blackboard site.
Think of your Blackboard site as three areas: content, communication, and assessment. The three areas should align with each other and one should dovetail into the next.  Blackboard's OnDemand Learning Center has some great tutorials which can be helpful as you begin designing your course.


Click on this link to access the series (day 6 will be on top, day 1 on the bottom).

Alternatively, use the list of posts along the right side of the blog to access each day.

Monday, January 24, 2011

Discussion Boards in Blackboard

This tutorial will demonstrate how to create and administer Discussion Boards in Blackboard 9.1. To learn more about Blackboard, view the Discussion Baord section from the Blackboard User Guide.

Creating a Discussion Board

media_1283348832283.png
From any Content Page, you can click on the Discussion Board link.

Alternatively . . .

media_1283349072954.png
Click on the Tools menu and access the Discussion Board.

Create Forum

media_1283349518546.png
You can create a new Forum (or discussion board) or select an existing one. Notice,  you are given statistics on the number of participants in each discussion board.

Enter Forum Information

media_1283350007033.png
Be sure to write a meaningful name and description of the discussion board, especially if you have created more than one.

Forum Availability

media_1283350580010.png
Set availablity settings.

Forum Settings

media_1283350607098.png
Allow anonymous posts
Allow students to remove own posts
Allow students to modify own published posts
Allow post tagging (only instructors can tag post, but students can view them)
Allow students to reply with quote (like email)
Allow file attachments
Allow students to create new threads
Subscribe - Allow students to follow each other (like Facebook or Twitter)
Allow members to rate posts
Force moderation of posts (instructor controls posts... until they are OK'd by instructor, they are not seen by class)
Grade - Grade threads or forums . . . or don't grade at all.

Create Thread

media_1283350897490.png
You can create multiple threads within a forum. A thread will usually constitute one topic/assignment.

Thread Actions

media_1283350989715.png
Click on the chevron (circled) to access thread options.

Creating a Message

media_1283350949670.png
Each thread must start with a message (call to action). This lets the students know what to do in the thread. The thread will typically start with a question/scenario or comment, then invite others to respond.

Grading Discussion Board

media_1283351069132.png
If you selected the GRADE option, you will also see the Grade Forum (or Grade Thread) button on the screen.

Enter Grades

media_1283351100199.png
You can click on the posts to view all of the entries for each student. Click grade to enter the grade.

Submit Grades

media_1283351811250.png
When you grade, Blackboard will generate statistics in addition to allowing you to see student entries. Click edit grade to enter final grade.

Edit Grade

media_1283351850370.png
If you've attached a rubric, you will be able to view it while grading. Otherwise, enter numeric grade and provide written feedback for the student. Grading notes are used to enter periodic comments (perhaps weekly) to remind yourself of entries the student made in the discussion board. This is helpful if the discussion board project will last for multiple weeks.

View Discussion Boards Demo

This short clip (turn the volume up) covers discussion boards. The URL to share the link with students is: http://www.screencast.com/t/Yzk0NDllZGY

If you need further help, please call the 24 hour Blackboard helpline at 202-274-5665 or toll free: 877-736-2585. 

Friday, January 21, 2011

Onboarding Students to Blackboard

Onboarding is a term companies use to discuss the process of orienting new employees.  This post uses the term to compare that process to orienting students to your Blackboard site.  This post will also accompany today's Blackboard workshop at the Community College of the District of Columbia.  The top ten:


1. Prepare a Week 0 -- Week 0 is like a prequel to the real thing. Have students submit a faux assignment, take a mock quiz, use the journals or participate in a discussion board.  Personally, I like to give a grade (pass/fail) for the assignment, typically with the quiz score being the way I 'grade' the assignment.  The quiz will usually just have a couple of multiple choice questions.  The goal is for students to feel good about Blackboard before the grades REALLY count.
2. Scaffold Usage of Tools: Scaffolding is an educational term that refers to the purposeful sequencing  of content and instruction.  Therefore, before using wiki's in the classroom, you might want to first discuss how to write for the Internet (individual writing). Then perhaps move to discussion boards to practice how to comment and critique the ideas and words of others.  Finally, introduce the wiki, which employs the aforementioned skills and adds another level of collaboration.
3. Use Screencasts to model Blackboard functionality: Screencasts are short videos which record you computer screen, mouse movements and voice.  Screencasts are an effective way to model Blackboard functionality to students.  You may also use them to review q quiz or explain an assignment.
4. Discuss the Pedagogy Too: If the students don't know WHY they are doing something on Blackboard, it's likely they won't do it well/correctly.
5. Write concise instructions and descriptions and use consist terminology: Never post an item without a description.  Cite due dates, cite connections to the course, share what they should try to extract from the reading/movie/PPT.  Oftentimes, students JUMP right into Blackboard, the couple of sentences they spend reading your description before they open a file may be the only academic orientation they experience.  Make it a good one!
6. Employ Tools in the Class:  Use Blackboard tools in the class.  Use podcasts or blogs to share information with the class.  The more you use it and experience, the greater your personal comfort level.  This will surely translate to the classroom as students will begin to use the tools and feel more confident when they have to create content.
7. Share you experiences with technology: Converse about Blackboard before complaining starts.  Be open and honest with the students.  The shared experience will build community.  Also consider creating a discussion board that acts as a townhall or digital cafe.  Allow students to post their comments, concerns, ideas and be sure to participate as well.  The students will appreciate your presence.
8. Discuss Academic Integrity:  It's so easy for students to plagiarize.  Have an honest discussion about your expectations with the class.  Also introduce SafeAssignment, the submission tool that checks for plagiarism.
9. Set groundrules for academic versus non-academic writing:  Students should not treat Blackboard like it is Facebook.  Be sure to set groundrules for what type of writing is acceptable for your class.  It may also be a good time to talk about 'process oriented' writing ... the concept is often unfamiliar to students.
10. Mention all sources of Blackboard help: 
Did you know that all University of the District of Columbia students have access to FREE Online Tutoring through SMARTHINKING?

There are Math, Business, Nursing, and Writing subjects and over 1500 tutors to help you!

To access FREE tutoring:
1. Log into your Blackboard account
2. Select a course
3. Select "tools" on the left
4. Scroll down to click “Smarthinking login

If you have difficulties accessing your account, please call 202-274-5665 or email ejones@udc.edu. 
Once you are logged in, check out their Student Handbook here http://www.smarthinking.com/static/content/SMARTHINKING_Student_Handbook.pdf  and feel free to contact SMARTHINKING’s Customer Support Team at 888.430.7429 ext 1 or support@smarthinking.com. 

media_1282767193876.png

If you have issues, a service desk is available 24 hours a day. You may also be able to have a LIVE CHAT. You can access this site directly at http://helpdesk.lrdudc.wrlc.org/

MORE HELP

media_1282767433848.png
Visit the Center for Academic Technology webpage [http://lrdudc.wrlc.org/cat/] for other Blackboard related help.

Thursday, January 20, 2011

So You Created an Assignment in Blackboard, NOW WHAT?

This tutorial will describe how to access an assignment (learn about assignments) in Blackboard. Managing assignment submissions via Blackboard provides students with an opportunity to either upload a file or directly insert (copy and paste) text into the submission box. Either way, this tutorial will show you how to access their work.

Access the Grade Center

media_1289227511721.png
Two options:
1. Select the chevron (also known as the 'double down arrow' -- shown on the left) to expand the GRADE CENTER menu option then go to the next step.
2. Select the horizontal chevron on the right, which will bring you to the FULL GRADE CENTER. Then skip the next step.

Access the FULL GRADE CENTER

media_1289227526398.png

Search for the Assignment

media_1289229351813.png
The GREEN EXCLAMATION POINT denotes an assignment that needs to be graded. Click the chevron to view grading options.

View Grade Details

media_1289230728438.png

View Attempt

media_1289230845265.png

View Submission -- As Text

media_1289230930691.png
You can direct students to either submit a file or to paste their text directly into the submission box. This step shows what it will look like if they put text directly into the submission box.

View Submission -- As Uploaded File

media_1289231041077.png
Since most students use a word processor to write papers, they may be more comfortable uploading the file to Blackboard. Click on the link to download the file. You will then be able to open the document with MS Word, read and comment. View this Blackboard tutorial on "Electronic Paper Grading"

Providing Feedback

media_1289231800246.png
When grading downloaded files, you must decide how to provide feedback. You can use the COMMENTS option in MS Word to embed comments into their paper. Once complete, you must then upload the graded paper back to Blackboard so the student may view your remarks. Alternatively, you may enter comments into the FEEDBACK TO USER box.

Using Instructor Notes

media_1289231812636.png
This option allows you to record personal notes on a student's submission. These notes are NOT seen by the student but can be used as a personal reminder if there is a need for follow-up.

SUBMIT

media_1289232216742.png
If you need further help, please call the 24 hour Blackboard helpline at 202-274-5665 or toll free: 877-736-2585. For more information on Grading Assignments, view this site.