Friday, November 25, 2011

Top Ten Tips Or Rules For Engagement With Webinars

Professional Development Comes in Many Forms these Days. With tightening budgets, webinars are a great way to expand your skill set and stay current on topics in your area of professional expertise. Webinars are now offered for many topics but several are offered to improve your skills in teaching online.

cat logo2

The Center for Academic Technology offers a wide variety of professional development opportunities including webinars. To stay current with what’s being offered, bookmark the following link: http://lrdudc.wrlc.org/cat/workshops.php

If you accept that training webinars are important to your continued growth as an online instructor, then the next step is to understand how to best make use of training webinars. Here are the top ten tips or rules for engagement with webinars!

1. Be on the lookout for training webinars. Announcements for training webinars come from many sources: your school’s emails, professional organizations to which you belong, online publications to which you subscribe, other organizations doing mass email solicitations, and listings in print publications. A search of the Internet will also bring up various upcoming training webinars. Certainly attend those required by your school, but don’t hesitate to attend others that are not required. While they may cost you a bit, if the subject is important to your professional growth—and helps keep you employed—then go for it. (Note: Your school will usually offer informational seminars as well. These introduce faculty to new course delivery systems or upgrades, new school policies, etc. They may or may not be required but regardless, always attend any offered.)

2. Be sure all software components needed to experience the training webinar are working and know the procedures of the webinar.
Many folks get frustrated when first signing on to the training webinar because they don’t know (or forgot) how to turn on the audio and/or webcam in their computers. Make sure you know how to do this. Adjust your volume as necessary. Also if you will be speaking, be sure there is no noise in your background to annoy the webinar attendees. You may need to place yourself on “mute” if there is excessive mic feedback or other external noise you can’t control. Know the procedures for asking questions, inserting items into chat-like features, etc. Recognize others in the class when they make a good point. Be friendly but always be professional. If you arrive early, be social. And don’t try to take over the presentation—even if you are the presenter. Unless billed as a lecturer, you are a facilitator, so be certain to get others involved.

3. Be an active participant in the webinar. By being actively involved in any training webinar, you embrace what is being taught for the long haul. Merely watching and listening to the presentation is great for attendance stats, and a few pieces of information will stay with you—but most will be forgotten once the webinar ends. Also if the webinar is hosted by your school, then your active participation will help you stand out as an instructor who wants to improve, who is interested in becoming better, and who is truly a professional—always good for evaluations, more sections to teach, and long-term employment.

4. If you miss a webinar, view the archived version; always save archived versions. It is nearly impossible for every webinar you need to attend or want to attend to be offered at a time that neatly fits into your schedule. Work, family, education, and other responsibilities get in the way, and the folks who put on the training webinars know this. Thus, most webinars are available from your school in free archived (recorded) versions. There is usually a fee for webinars from outside organizations. For the ones presented by your school, always view the archived versions and be sure to let your supervisor know you did this. (And if a nonrequired training webinar is available in a recorded version—even for a fee—carefully weigh its benefit to you as an online instructor.) Finally, when possible, save all archived training webinars. You will not remember, in the first look, all of the material included, and/or you might not need the material immediately.

5. Suggest that your school participate in a webinar if you deem it important. Some webinars can be viewed only if your school subscribes to (or obtains a license for) the webinar; usually, your school will receive notice of these training webinars via email (and sometimes snail mail) solicitations. But there are many training webinars available, and it’s quite possible that your school might not know about some that you think would be valuable for online faculty (and others interested in online teaching). When you come across such a subscription-only webinar, don’t hesitate to suggest it to your supervisor. Even if the school is aware of that webinar, it will look great if you take the initiative to suggest it.

6. Take notes on especially helpful material. The training webinars are packaged so all information is neatly, clearly, and logically presented. But as you know from any webinar or course you’ve taken, some of the material will be more salient than the rest. Thus, it’s important for you to be ready to take notes on items you find especially helpful. You can do this with pad and pen (the old-fashioned but always reliable way), or if you have two monitors you can use one to type notes while the webinar is live. Other technical approaches to taking notes are: taking screen shots (holding down the Ctrl key while hitting PrntScr, then either hitting Paste or Ctrl V to paste it to a blank document) or using your cell phone or digital camera to take pictures of the portions you want to save.

7. When attachments and websites are offered, snatch them up. Many webinars will present attachments and/or helpful websites in addition to the prepared information on the screen and that given by the presenter(s). Make it a point to save these. While all of it may not be important or specific to your needs, it’s better to have a complete set so you can later discard what you don’t need. Sometimes, an initial judgment of “I don’t need that!” later turns into “Drat, I wish I had saved that!”

8. Keep an active list of upcoming training webinars. You don’t want to miss any webinars that are important to your growth as a professional, and you especially don’t want to forget about any required by your school! So . . . organize. Keep a list—either on the computer or on paper but one you check regularly—to be sure you know the dates. Use any reminder technology you have to make you aware of them and jot them down in a day planner if you use one. Sure, you might be able to view these in a recorded version if you miss them, but it’s better for your active learning and your status as a really good instructor to attend the training webinar in its live form.

9. Use the webinar as an additional lesson in how to present online training. This is a nice bonus from each training webinar you attend: by viewing the presentation format of the webinar (PowerPoint; black-and-white text; webinar tools such as Whiteboard, Share Computer Screen, and Polls; use of color and sound; etc.) and the style of the presenter (enthusiasm, clarity of material, speaking prowess, ability to get attendees engaged, etc.) you can learn what makes for a really great—or not-so-great—training webinar. You may want to do one, or you may be called on to present one, and the more information you have to help you give a great training webinar, the better!

10. Keep a list of all webinar presenters and their contact information. Somewhere during the webinar the name(s) of the presenter(s) and contact information will be offered. Be sure to keep an ongoing list of this information, including the title of the presentation. You may need more information down the road or have a question that was not covered in the webinar. Being able to contact the person(s) who presented the webinar will allow you immediate access to someone who can give you the information you need (and if the person is associated with your school, it sure gives credence to your reputation as an instructor who is always looking to improve).

Tips can be found at: http://www.magnapubs.com/newsletter/story/5848/

Wednesday, November 23, 2011

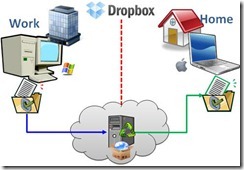
Looking for a great tool that will allow you to easily access your files from anywhere? Give Dropbox a try.

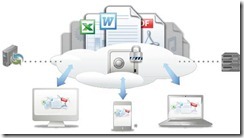
Dropbox is a web based cloud storage system that will allow you to save files on one computer and access them from any other personal computer or mobile smartphone. Whenever you create a document or file and upload it to the Dropbox, the file is instantly made available on your other internet accessible Windows, Mac, Linux, iPad, iPhone, Android and BlackBerry devices. Dropbox eliminates the need for carrying files around on a zip or thumb drive or emailing them to yourself.


 Dropbox2


Dropbox is likely to appeal to a wide variety of users, becoming one of those resources you quickly begin to wonder how you did without. How can you know if Dropbox is right for you? A few key questions to ask yourself are:

Do you need to collaborate with other faculty or students on a project? Collaboration is one of the best and most exciting features of Dropbox. Team members may collaborate on a project from literally anywhere in the world and ensure that changes made to any project documents or files are instantly available to all team members.


Dropbox3


Are you working with large or frequently expanding data or project files and simply need more storage space? It can be frustrating trying to frequently determine how much additional storage space you need for ever expanding files. Do you need 500gbs, 1TB or 100TB? How much is enough?


Dropbox4


 Are you tired of trying to keep track of what is on your mobile drives? Keeping track of multiple thumb, zip or jump drives, external hard drives and the like can become cumbersome not to mention expensive if you have to continually buy more of these items. Cloud storage services such as Dropbox eliminate this problem by providing one point of access for all of your storage needs across ALL of your internet accessible computing devices.

Are you concerned about data lost due to computer accidents? Computer accidents do happen. From power surges to lattes spilled on laptops, unexpected accidents can make data retrieval a major headache. While Dropbox won’t keep you from spilling that Latte on your keyboard, it may save you the headache of data retrieval by providing quick and secure access to all files you have stored on its cloud server.

Are you concerned about your tablet, smartphone, or mobile drive being lost or stolen along with all your data? Well today there are numerous resources such as Prey, Lookout Security and others, that will help you to retrieve these items if they are lost. But, with Dropbox, retrieving your valuable files and information is easy – they are right where you put them. Anything you upload to the Dropbox is accessible from the Dropbox server – anytime.

Are you travelling and want to ensure that you have access to your conference paper or presentation? While many people simply email a copy of the item to oneself when travelling - Dropbox eliminates the need for the “email backup” strategy. Using the cloud provides a safe, secure, easily accessible virtual file cabinet for all of your work.

Dropbox is free and comes with 2 GB of space which one may use for an unlimited time. Those requiring more space may purchase up to 100GB of space, or teams and administrative groups may access 1TB or more. To download a free copy of Dropbox or to learn more about this helpful resource, please go to https://www.dropbox.com.

Wednesday, November 16, 2011

Want to connect Your Textbooks right into Blackboard for Your Spring Courses?

Now You Can! There are several large book companies working hard to make the integration seamless between the learning management system and the text book. One Company doing just that is Barnes & Noble.

What’s the Big Deal? What’s included in the Barnes & Noble and Blackboard Integration?

nook logo

The Integration contains tools that enable users to do more in their courses:

Link to NOOK Study Tool - Integrates NOOK Study eTextbooks into a syllabus, course content or assignments quickly and easily by enabling educators to create links to chapters, sections or pages of books for their courses.

Textbooks List Tool - Enables textbook eCommerce by giving educators and learners the ability to purchase and distribute eTextbooks from within the LMS environment (NOOK Study eTextbooks often are priced up to 60% less than print textbooks - using NOOK Study can help students save money). Moreover, there are numerous free books available for download.

How can I get Started Using Nook in My Blackboard Course?

The first time you click on a NOOK Study link, you will see a screen (see screen shot below) prompting you to select whether you have NOOK Study installed or not.

  • If you have NOOK Study installed, this choice will be remembered. The next time you click on any NOOK Study link, it will bypass this screen and automatically attempt to launch NOOK Study on your computer. If you have NOOK Study installed on your computer, the link will open the application and if you have purchased the eTextbook for that title, the book will open automatically to the last page read.
  • If you do NOT have NOOK Study installed, clicking on the "I do NOT have NOOK Study" link will take you to the download page where you can download the application. The next time you click on any NOOK Study link, you will be presented with the same screen so that you have the opportunity to launch NOOK Study directly.

Monday, November 7, 2011

Screencasting Made Easy Five Times

Ever need or want to show something to someone and find that describing it over the phone or in an email simply fails to to convey the message? You might consider screecasting. I highlight below several free applications that make screen capture and sharing easy as 1-2-3. Whatever your preference, each of these tools are easy to use, highly useful, and easy to share.


1. Jing (http://www.jingproject.com): An excellent system from TechSmith which allows users to make five-minute screencaptures and either download the videos or post them to screencast.com. Beyond recording video, Jing also allows you to take a picture of any portion of your desktop, draw on it, add a message, then upload your media to a free hosting account. You then receive a small URL that you can share with others who may need to see the image or video. Works with Macs and Windows machines.


jing


2. Screenr (http://screenr.com): A tool that allows users to make screencasts without downloading any software. Simply click the record button, capture the screen and then share the recording.  

screenr_logo_small


3. Screencast-O-Matic (http://www.screencast-o-matic.com): A Java-based screencasting tool that uses only one-click and allows for up to 15 minute screencasts that are hosted on the site or uploaded to YouTube. Watch a quick demo Demo.

logo-screenomatic


4. Wink (http://www.debugmode.com/wink): This tool is a can capture screenshots & enables users to add explanation boxes, buttons, titles & more. It supports various output formats like .EXE, .FLV, .HTML, etc.


wink


5. ScreenCastle (http://screencastle.com): This tool allows users the ability to launch the screencast recorder and record a screencast directly from their browser.

screencastle_logo

Thursday, November 3, 2011

Android 4.0 OS

With all of the excitement about the release of the Android 4.0 OS and our recent posts about mobile computing applications, it may be a good time to consider whether this new operating system dubbed “Ice Cream Sandwich will extend mobile computing options for students and faculty in a meaningful way. Android 4.0 or Ice Cream Sandwich (ICS) is the latest version of the android operating system and purportedly combines the best features of predecessors, Gingerbread and Honeycomb.


IceCream2


(ICS) features a new, polished button less interface in which apps are controlled through virtual buttons at the bottom of the screen. The intuitive and adaptive nature of the virtual interface is intended to significantly enhance multi-tasking by allowing one to more easily see, navigate and close applications.


IceCream1


Improvements that may be particularly attractive to students and faculty at include better camera functionality and a “People App” that will combine and centralize access to various social networking feeds. Improvements in copy and paste functions and the ability to more easily create screenshots have also been made. Of particular note is the improved the keyboard and dictionary functionality of ICS. According to Google developers “Error correction and word suggestion are improved through a new set of default dictionaries and more accurate heuristics for handling cases such as double-typed characters, skipped letters, and omitted spaces. Word suggestion is also improved and the suggestion strip is simplified to show only three words at a time. To fix misspelled words more easily, Android 4.0 [also] adds a spell-checker that locates and underlines errors and suggests replacement words. With one tap, users can choose from multiple spelling suggestions, delete a word, or add it to the dictionary."

IceCream3


Faculty or students with low vision will also be able to explore the screen of an ICS ready device by dragging their fingers across the screen. An internal app configured to act as a screen reader will provide voice descriptions of the content.

Several devices that have or are expected to get Android 4.0 include the Samsung galaxy nexus and Motorola devices such as the Droid Razr, Razr, Droid Bionic and Xoom tablet.

To learn more about the exciting and “delicious” options offered by Google’s Ice Cream Sandwich, go to http://www.android.com/.